Industrial Heat Sealing Irons
saves time and money by allowing patching and splicing of belts at your facility

Industrial Heat Sealing Irons
In-House industrial heat sealing saves time and money by allowing patching and splicing of belts at your facility. Taconic offers handheld digitally controlled heat sealing irons in two sizes for splicing and a handheld patching iron for smaller applications. Taconic also manufactures a variety of materials to create heat sealed butt and overlap splices for PTFE belts. Our PTFE fabrics are cut in 3, 4, 6 and 10 millimeter widths and our PFA films are cut in 1, 2 and 5 millimeter slit widths. Silicone coated fabric is also available in 8.5" x 11" sheets.
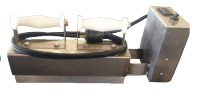
3" x 6" Handheld Iron
- Heated platen size: 3" x 6"
- Weight: 17lbs
- Temperature controlled up to 750 °F (399 °C)
- 120V voltage / 220v voltage (based on model)
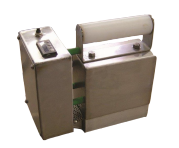
 3" x 12" Handheld Iron
- Heated platen size: 3" x 12"
- Weight: 20lbs
- Temperature controlled up to 750 °F (399 °C)
- 120V voltage
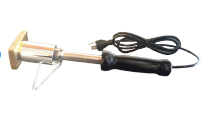
2" x 3" Patching Iron
- Heated platen size: 3" x 6"
- Weight: 17lbs
- Temperature controlled up to 750 °F (399 °C)
- 120V voltage
Taconic PTFE Heat Sealing & Belt Installation Procedures
|
|
| Heat Sealing Iron |
| Tape Measure |
| Straight Boards (2' x 6') |
| Large C-Clamps (4) |
|---|
Steps:
- Determine the splicing work area on the machine. The work area should be a flat smooth surface at least one to two feet in length. The area should be cleaned of any water, oil and debris with isopropyl alcohol. Plug the iron into an outlet close to this area and allow time to heat. Set the iron at 750 °F (399 °C)
- Pull the new belt through the slots of the iron so that the ends will meet at the splicing area.
- Clamp one end of the belt by placing a straight board width wise and secure it to a solid support with the C-clamps.
- Tension the belt, overlap it and line up the edges. Measure the distance of the overlap on both sides. The difference in length should be +/-.25". Clamp the other end of the belts as described in step 3.
- Insert a cutting surface under the overlapped area to prevent damaging the iron.
- Using a straight edge, cut the material splitting the overlapped area.
- Remove the top and bottom excess pieces. Then remove the cutting surface from under the belt.
- Insert the heat resistant padding under the cut splice area.
- Place and align the reinforcement material (fabric on the bottom, then the film on the heat resistant padding) under the cut splice area. Be sure the belt area of splice, reinforcement and film are all free of debris.
- Cover area to be sealed with the release cloth/film.
- Use a portion of the excess pieces from Step 7 to test the iron temperature and to determine the minimum time required for heat sealing (1-2 minutes is usually sufficient). A proper seal, when pulled apart, will delaminate the PTFE from one of the fiberglass sides.
- Once appropriate time is determined, begin heat sealing the splice covered with the release cloth/film. Be sure to seal the entire area.
- Feel for voids in the seal (waves, wrinkles, loose areas). A good seal cannot be picked apart.
- Once the bottom reinforcement is complete, any top covers can be sealed in the same manner.
- Allow belt to cool for 30 minutes to 1 hour. Repeat step 13 to check for voids. (Let seal cool to room temperature before running the belt).
- Remove clamps. You are now ready for a production run on your Taconic belt.
